SecurOS Lite
We have prepared a template for video surveillance based on the free version of SecurOS Lite software.
The main advantages of this software include:
Unlimited licence validity period
Unlimited size and period of video archive storage
Maximum number of IP-cameras - 32 video + audio channels
Support for all leading manufacturers' equipment (more than 10,000 models)
Web-client (including SecurOS WebConnect)
In our catalogues Public template is called WIN2016-RUS-SecurOS. Deployment is standard, following these instructions)
NOTE:
For the correct operation of the scheme on the client side, there must be a router supporting VPN protocols.
IMPORTANT:
The only thing to consider is that the computer name must not be changed, otherwise the SecurOS software will not be able to run. You can change the name later.
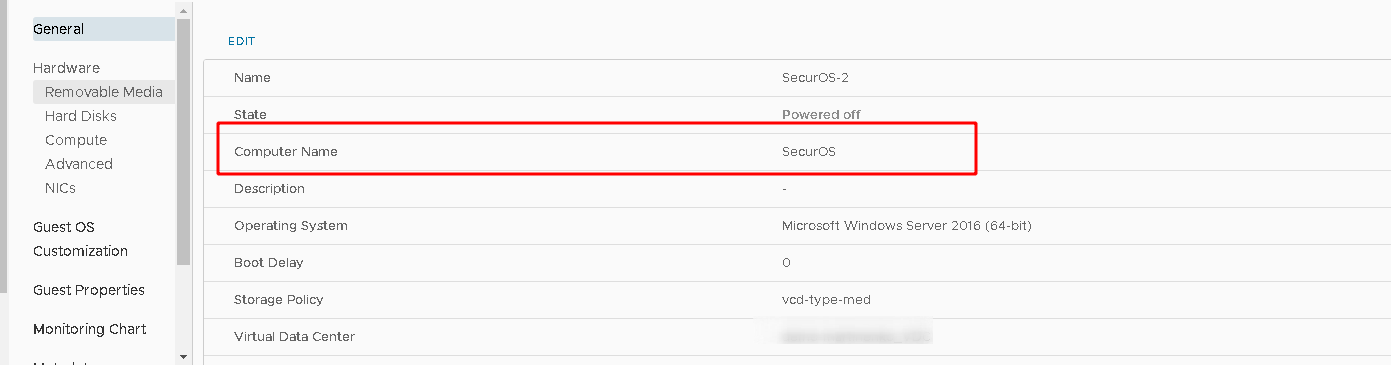
Figure 1. VM control panel - VMware Cloud Director
UPDATE:
We have refined this template by adding the function to receive a notification in telegram chat when camera activity is detected during off hours (any time you specify). To be precise, you will receive not just a notification, but also a photo from the camera.
INSTRUCTION:
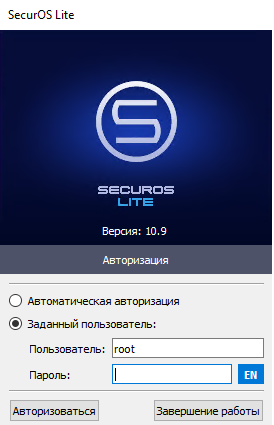
Launch the SecurOS Lite app on your desktop and connect with your credentials (change them later):
login: root
password: securos2006
After that, the windows of panels will open (fig.2):
1 - SecurOS Lite control panel (the main SecureOS settings and control panel)
2 - SecurOS media client (camera monitoring panel)
3 - health monitor (monitor of ongoing processes, errors, signals)
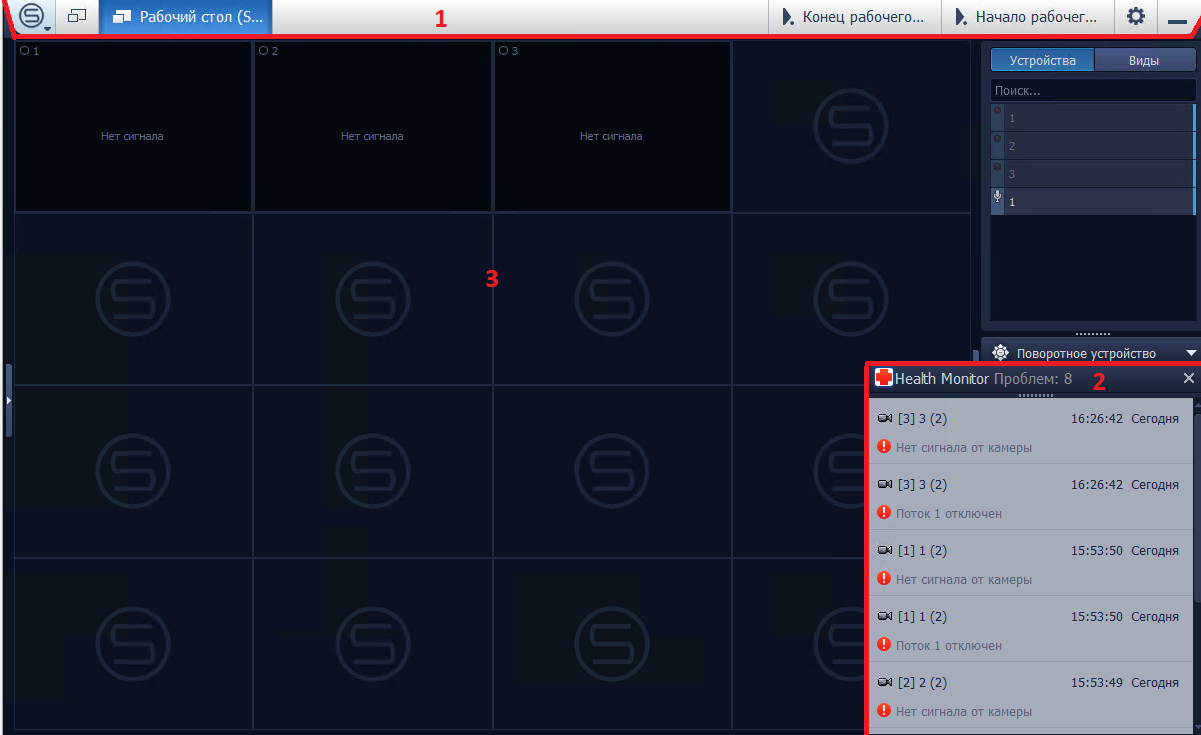
Figure 2. SecurOS software interface
To configure SecurOS, click on the control panel the gear ![]() (in the upper right corner of the SecureOS control panel).
(in the upper right corner of the SecureOS control panel).
The SecureOS system manager including the following sections will open (Fig. 3):
- Users and Permissions
- Archive export profiles
- Layouts and views
- Event Filters
- Macro commands
- Maps
- Schedules
- Servers and workstations
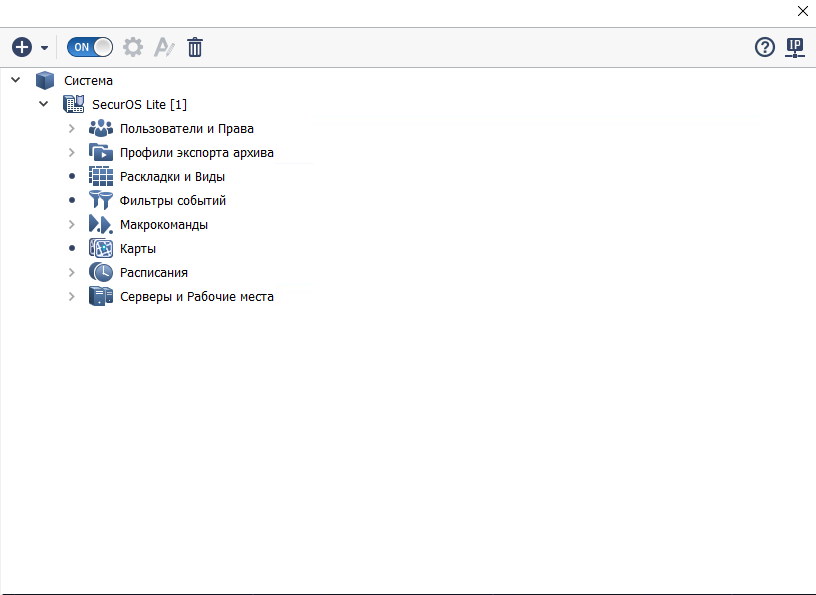
Figure 3: SecurOS System Configuration Manager
In the Settings Manager, you can change the password, add user accounts, add and configure your video and audio capture devices.
In the WIN2016-RUS-SecurOS template, some preconfigurations have already been done:
- Two video capture devices have been added, recording modes and actions during working and non-working hours have been configured.
Let's consider the functionality in more detail below
Adding new video capture devices (video surveillance cameras).
Two cameras have already been added to the template: video capture device 1[1] and 2[2].
To add new cameras, hover over the Devices (cameras and microphones) tab and a green Plus icon will appear on the right (Fig.4). Click to add video and audio capture devices. You will be prompted to set the camera name, select the model and type.
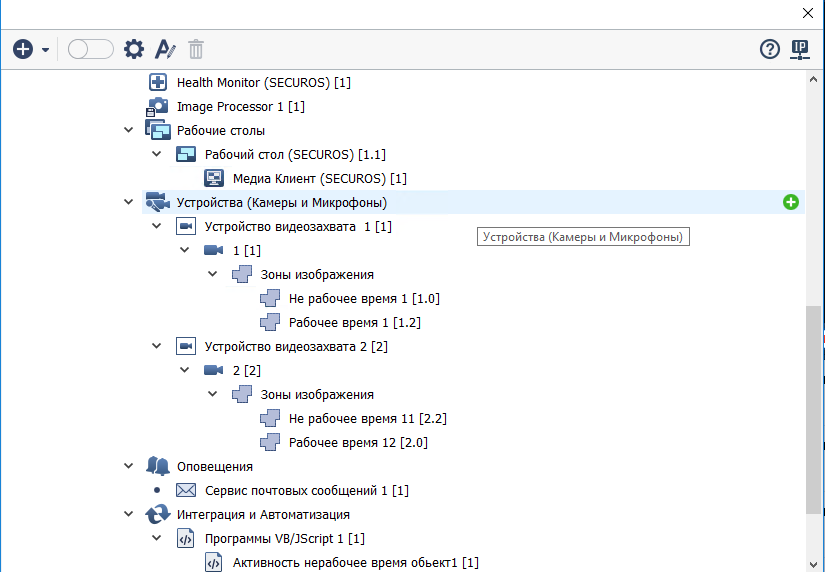
Fig. 4 SecurOS Settings Manager - Devices (camera and microphones)
After entering the name and selecting the model, a new tab with the name of your camera will be added and you will be offered a connection window where you need to enter the IP-address of your camera, login and connection password. (Fig.5)
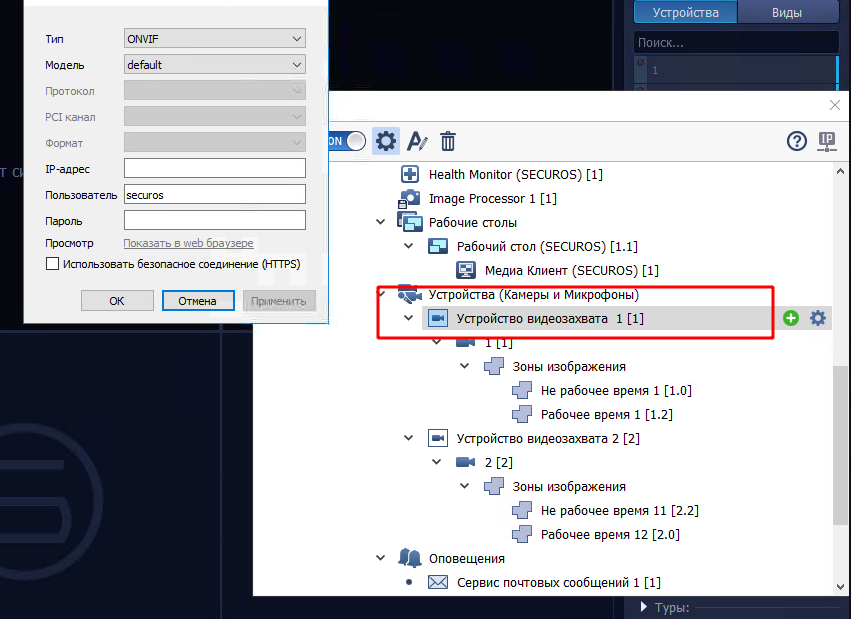
Fig.5 SecurOS Settings Manager - Settings for connecting video capture devices.
Next, you need to create two image zones for working and non-working hours.
Setting up is similar to adding video capture devices. Click the plus sign and enter a name. Next, the zone settings panel opens automatically. Here you need the following (Fig.6):
- configure the zone to be alarmed;
- edit brightness and contrast to minimise the number of false alarms.
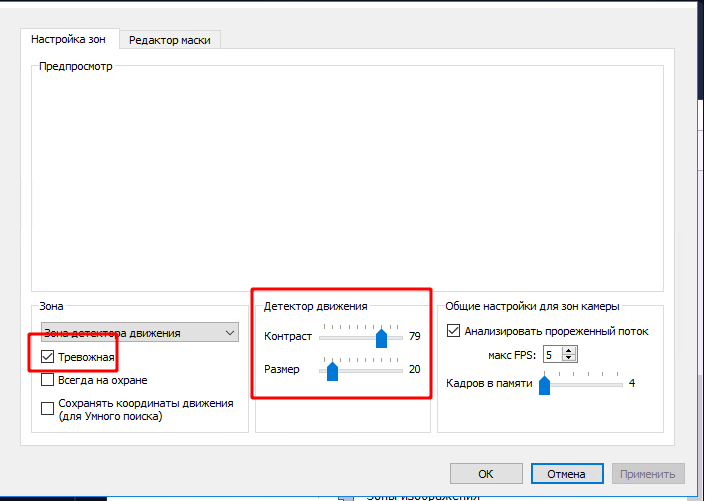
Рис. 6 Панель настроек зон видеозахвата
- On the Mask Editor tab, you can remove certain areas from the motion detection zone. For example, window blinds or objects that are constantly moving (Fig. 7)
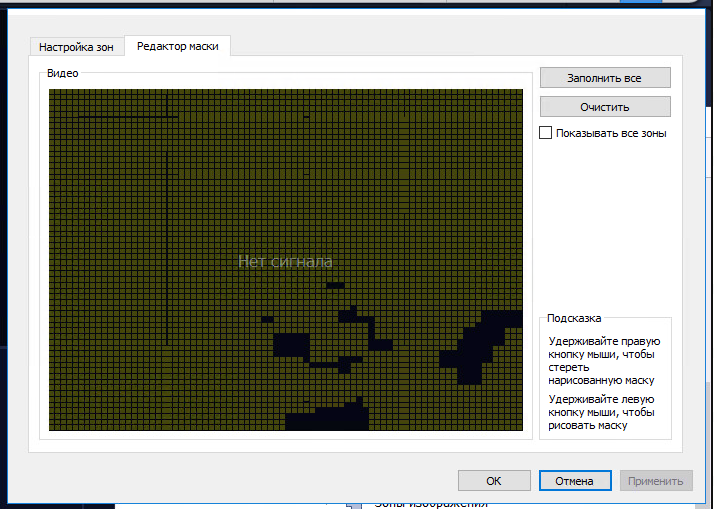
Рис. 7 Панель настроек зон видеозахвата - редактор маски
Important:
There should be two zones for each camera, for working and non-working hours, so that you can switch them with a macro command.
Next, in the SecurOS Settings Manager, go to the Schedule tab.
In the schedule tab, you need to specify a non-working time, which is the time when the camera will detect motion and send notifications to Telegram chat. In the template, it looks as follows (Fig.8):
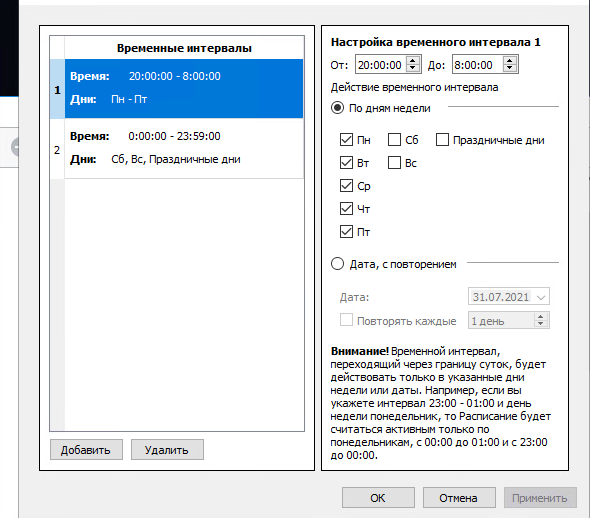
Fig. 8 Schedule settings panel
Next, in the SecurOS Settings Manager, go to the macro commands tab.
The template has macro command presets for the working and non-working hours of the two video capture devices. To add new commands, double-click an empty cell in the tables of the desired type.
Macro command for: Start working time (Figure 9)
Scheme of work:
At the point when the non-working time schedule has finished, the following actions are performed:
- The non-working time zones for the required cameras are disarmed and the working time zones are armed.
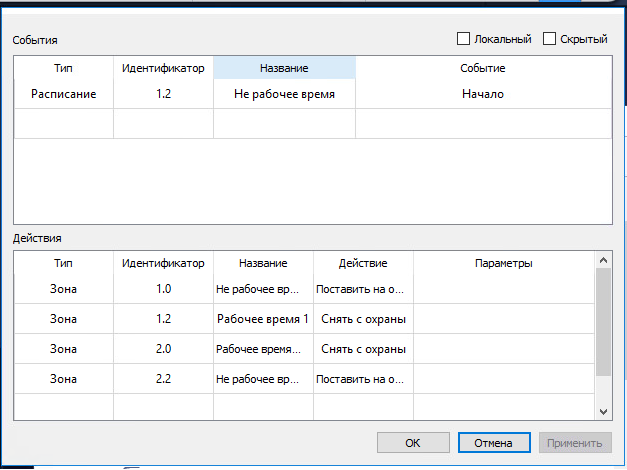
Fig. 9 Macro command settings panel - Start of working time
Macro command for: End of working time (Fig. 10)
This macro command performs the opposite action - when the start of non-working time event occurs:
- disarms the zones for working time, and arming the zones for non-working time.
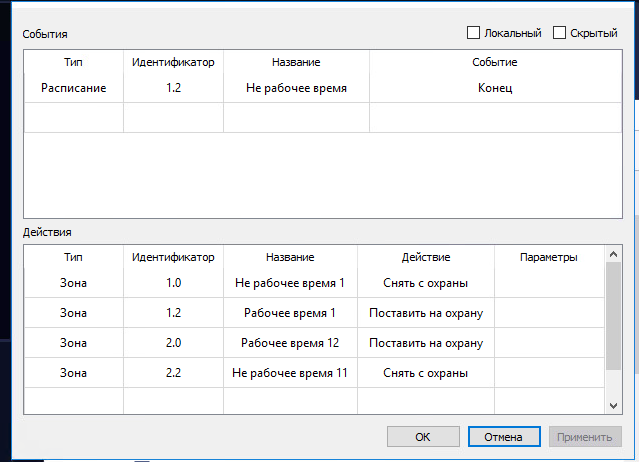
Fig. 10 Macro commands settings panel - End of working time
Telegram alerts:
In the Servers and Workstations tab - SecurOS Computer - Integration and Automation - VB/JScript Programs
There are two JS scripts prepared: Activity after hours object1 and object2 (for each available video capture device respectively).
Schematic of the script: Adds script #1 to the "Integration and Automation" section for each video capture device individually. It triggers when an alarm is detected by the Image Processor process, takes a screenshot, after which a report is generated using script #2 for each video capture device individually, the purpose of which is to send a notification to Telegram
To add Notification to Telegram from another device, you need to create a new script.
Click on VB/JScript Programs, press Plus, enter the script name. (Fig. 11)
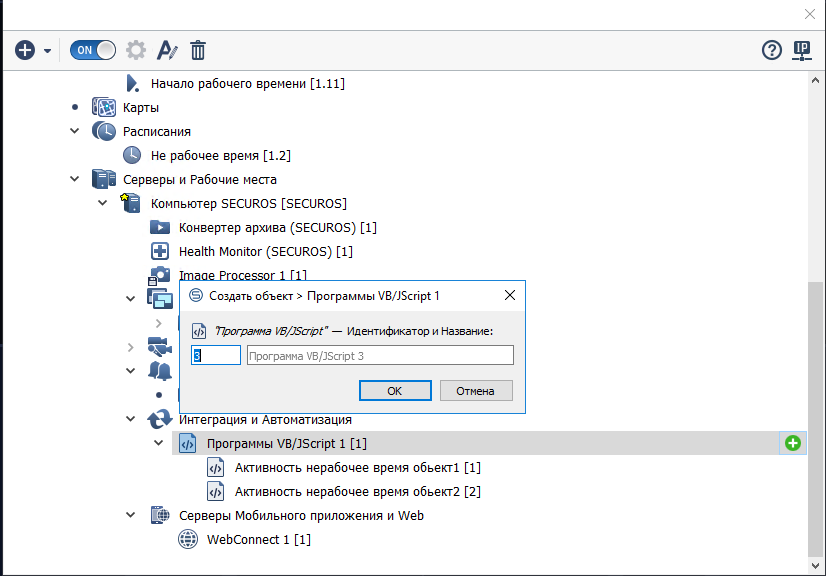
Fig. 11 Adding a new script
Next, the script input field opens. Please review the script itself below:
Script №1
1# {function Init()
2# Core.RegisterEventHandler("CAM_ZONE", "1.0", "MD_START", SendMessage);
3# };
4# function SendMessage(e)
5# {
6# Core.DoReact("IMAGE_EXPORT","1","EXPORT","import","cam$1;time$live","export_engine","file","export",
"filename$image_msk;dir$C:\\export","export_image","format$jpg;quality$70","process",e.vizualization);
7# var shell = new ActiveXObject("WScript.Shell");
8# shell.Run("powershell -file C:\\Scripts\\send_alarm_obj1.ps1");
9# };
In the script it is necessary to change the parameters for the necessary video capture devices: CAM_ZONE, 1.0, as well as the path to the second script in line 8. ( the content is below).
This script takes a screenshot of the alarm when an alarm is detected using Image Processor and puts it in the C:\Export folder, then execute the powershell send_alarm_obj1
Script №2
This script is stored in the directory: C:\Scripts\send_alarm_obj1.ps1
1# $token = "ВАШ TOKEN"
3# $chat_id = "CHAT ID"
4# $text = "Замечена подозрительная активность"
5# $URI = "https://api.telegram.org/bot" + $token + "/sendMessage?chat_id=" + $chat_id + "&text=" + $text
6# C:\Scripts\curl.exe POST "https://api.telegram.org/bot$token/sendPhoto?chat_id=$chat_id" -F photo="@C:\export\image_msk.JPG"
To complete it, you need to know your telegram token, chat ID, which you need to change.
This way, you can receive screenshots in the telegram chat during off-hours
Additional instructions on how to work with SecurOS software you can find at https://iss.ru/support/documentation
Useful articles:
Network Configuration of VMware Infrastructure (NAT, DHCP, Firewall, Static Routing, VPN)
